Public Key Certificates
As developers, we often come across the concept of public key certificates, the first encounter usually being when configuring https on a site or generating keys for SSH. Most will find a few commands online to run and then move on with their day, rarely delving into the topic to understand just what it is they are doing.
For the curious and those wanting a gentle introduction to the topic, this post is for you!
All of the code can be found at: github.com/aalbacetef/x => blog/public-key-certificates
Public Keys
In the digital world, a common problem is ensuring that a party is who they say they are. This can range from allowing them authenticated access to a server (ssh) to verifying that a given application was authored by a specific individual (code signing).
One of the most widely used solutions to this problem comes in the form of public key infrastructures.
Public key infrastructures are centered around public-private keypairs, exchanging them between parties and subsequently verifying them to establish authenticity.
A key is a string generated via an algorithm involving cryptography which tends to be its namesake e.g: an RSA key. These keys come in pairs: a private key and a public key. The private key is never shared by the individual and used for signing. The public key is instead widely shared and used for verifying that something was signed with its corresponding private key.
Digital signing
The general process of signing a digital message involves:
- a key generation algorithm: it produces pairs of public and private keys
- a signing algorithm: a way of generating a string based on the private key and the digital message
- a signature verification algorithm: given a public key, ensure that the signature corresponds to its private key
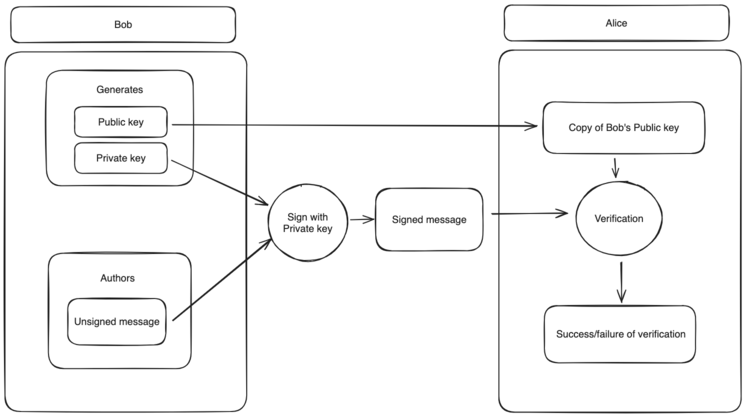
Below is a simplified diagram of signing a digital message. Note that in this case, the “message” can be anything with a string representation, such as an application, an email, or a commit.
In this diagram, Bob generates a pair of keys (public, private), authors a message, and signs it with his private key. Alice then acquires a copy of Bob’s public key, which they can use to verify that the message was truly signed with Bob’s private key, establishing authenticity. In practice things are more complicated of course. For example you rarely sign the message itself, but rather a padded hash of it called the message digest (hash-then-sign).
Identity
The astute reader would’ve noticed one particular issue, nothing in the keys says who they belong to. That is, given a public/private key pair that match, there is no way for Alice to verify that it was indeed Bob who signed that message.
Consider the following scenario: Alice is at a coffee shop and wants to download an application made by Bob. However, a skillful and malicious user (Mallory), has managed to pull off a man-in-the-middle attack, routing all traffic through their computer. Thus, when Alice goes to fetch the application from Bob, they instead receive a tampered version from Mallory. Similarly, when fetching Bob’s public key, they instead receive Mallory’s public key.
This makes it clear we need a way to ensure we can identify who keys belong to.
There are several ways to achieve this, one of the most common one being the use of a public key infrastructure (PKI) involving public key certificates and certificate authorities (CA).
Public Key Certificates
A public key certificate is an electronic document linking a public key to an identity. There are many formats, but the core fields are:
- the subject - who the certificate belongs to
- the public key - the public key being linked to the subject
- the issuer - who is verifying the certificate is authentic
- signature - a message digitally signed with the issuer’s private key
- validity - how long is the certificate valid for
The most common format is X.509. An in-depth discussion of this format is out-of-scope for this post, but I’ll be writing one up about it in the future.
To see what a certificate looks like, we’ll use the openssl cli.
Installing OpenSSL
apt:
sudo apt install -yq openssl
dnf/yum:
sudo dnf install -yq openssl
nix:
nix-shell -p openssl
(or if you want to specify a version)
nix-shell -p openssl_3_3
brew:
brew install openssl@3
Certificate Output
The command we’ll be using to view certificates is the following one-liner.
openssl s_client -connect reddit.com:443 -showcerts 2>/dev/null | openssl x509 -text -noout | less
Let’s break it down.
- -connect reddit.com:443this flag specifies the host and port we want to connect to
- -showcertsthis flag will print the server certificate list as sent by the server
- 2>/dev/nullthe command will print some stuff to stderr, so we redirect that to /dev/null
- -textthis flag will print the certificate in full
- -nooutdon't print anything else
Here’s what you should be seeing:
Certificate:
    Data:
        Version: 3 (0x2)
        Serial Number:
            01:3d:b0:3a:f9:ac:b5:45:cf:f5:aa:f2:99:f9:24:c8
        Signature Algorithm: sha256WithRSAEncryption
        Issuer: C=US, O=DigiCert Inc, CN=DigiCert TLS RSA SHA256 2020 CA1
        Validity
            Not Before: Jan 15 00:00:00 2024 GMT
            Not After : Jul 13 23:59:59 2024 GMT
        Subject: C=US, ST=California, L=SAN FRANCISCO, O=REDDIT, INC., CN=*.reddit.com
        Subject Public Key Info:
            Public Key Algorithm: rsaEncryption
                Public-Key: (2048 bit)
                Modulus:
                    00:cf:e9:9a:54:a3:a4:1a:e2:29:2d:45:81:72:b3:
                    a8:8b:4c:ce:2b:bb:a2:d7:3d:9e:69:6c:f3:32:d1:
                    68:ac:03:1d:1a:70:55:f8:86:5a:42:dc:90:e7:ef:
                    86:7e:fd:53:6c:ea:c0:38:a5:27:b4:ca:7a:96:e3:
                    5e:0a:5a:ee:65:20:b3:96:d7:e4:3a:99:3d:78:72:
                    7d:5d:61:14:3e:ba:45:14:22:db:05:5b:bd:d6:c9:
                    74:11:8b:dd:5a:ca:65:52:51:20:8a:53:b5:cd:d0:
                    d7:af:45:22:c9:4d:29:b7:3d:78:6a:b5:9f:03:bf:
                    44:48:48:e5:dc:43:08:70:28:1f:02:e9:a7:e5:df:
                    6e:39:01:24:6c:e5:80:a2:01:74:11:de:77:ae:ca:
                    15:55:0a:16:f8:75:45:56:a7:54:95:0d:1b:a2:24:
                    01:75:e7:3d:94:a2:83:07:c0:db:00:47:dd:08:2e:
                    39:cd:58:c6:cc:0f:07:87:0e:1f:9b:1d:65:e0:09:
                    43:a8:fd:ad:2c:4d:aa:36:6d:86:85:78:dc:b6:b9:
                    9e:c5:58:c5:1b:6b:78:9f:28:a1:5e:59:5f:f7:6c:
                    2f:b0:41:06:45:9f:17:f6:9c:55:25:37:7f:b5:fb:
                    5e:21:73:db:7b:eb:b9:0c:81:35:02:93:d8:72:97:
                    c2:07
                Exponent: 65537 (0x10001)
        X509v3 extensions:
            X509v3 Authority Key Identifier:
                B7:6B:A2:EA:A8:AA:84:8C:79:EA:B4:DA:0F:98:B2:C5:95:76:B9:F4
            X509v3 Subject Key Identifier:
                71:E0:50:D1:E7:80:52:FB:23:14:65:9D:43:A7:8D:31:AA:56:69:26
            X509v3 Subject Alternative Name:
                DNS:*.reddit.com, DNS:reddit.com
            X509v3 Certificate Policies:
                Policy: 2.23.140.1.2.2
                  CPS: http://www.digicert.com/CPS
            X509v3 Key Usage: critical
                Digital Signature, Key Encipherment
            X509v3 Extended Key Usage:
                TLS Web Server Authentication, TLS Web Client Authentication
            X509v3 CRL Distribution Points:
                Full Name:
                  URI:http://crl3.digicert.com/DigiCertTLSRSASHA2562020CA1-4.crl
                Full Name:
                  URI:http://crl4.digicert.com/DigiCertTLSRSASHA2562020CA1-4.crl
            Authority Information Access:
                OCSP - URI:http://ocsp.digicert.com
                CA Issuers - URI:http://cacerts.digicert.com/DigiCertTLSRSASHA2562020CA1-1.crt
            X509v3 Basic Constraints: critical
                CA:FALSE
            CT Precertificate SCTs:
                Signed Certificate Timestamp:
                    Version   : v1 (0x0)
                    Log ID    : EE:CD:D0:64:D5:DB:1A:CE:C5:5C:B7:9D:B4:CD:13:A2:
                                32:87:46:7C:BC:EC:DE:C3:51:48:59:46:71:1F:B5:9B
                    Timestamp : Jan 15 01:02:14.603 2024 GMT
                    Extensions: none
                    Signature : ecdsa-with-SHA256
                                30:46:02:21:00:CC:56:DD:89:61:29:4F:75:84:34:47:
                                8A:34:C2:33:4C:6E:ED:BA:05:4F:66:7B:77:B8:F8:00:
                                B9:C2:D6:D5:8B:02:21:00:A3:FC:DA:FE:11:36:77:E4:
                                72:AE:27:07:54:61:B3:38:A3:7B:D7:D2:72:68:34:96:
                                93:8C:3F:8E:BF:15:D1:BA
                Signed Certificate Timestamp:
                    Version   : v1 (0x0)
                    Log ID    : 48:B0:E3:6B:DA:A6:47:34:0F:E5:6A:02:FA:9D:30:EB:
                                1C:52:01:CB:56:DD:2C:81:D9:BB:BF:AB:39:D8:84:73
                    Timestamp : Jan 15 01:02:14.652 2024 GMT
                    Extensions: none
                    Signature : ecdsa-with-SHA256
                                30:45:02:21:00:90:62:E6:AD:59:63:F6:09:1E:82:9C:
                                35:9E:67:5B:61:48:57:38:86:AF:BF:92:54:BB:BB:DF:
                                BC:C6:40:53:A8:02:20:33:C8:FA:8F:D3:66:E8:31:29:
                                33:1E:CD:10:45:00:7D:E1:90:E4:8C:FB:AD:7B:B5:C9:
                                AF:4D:56:C5:32:F5:21
                Signed Certificate Timestamp:
                    Version   : v1 (0x0)
                    Log ID    : DA:B6:BF:6B:3F:B5:B6:22:9F:9B:C2:BB:5C:6B:E8:70:
                                91:71:6C:BB:51:84:85:34:BD:A4:3D:30:48:D7:FB:AB
                    Timestamp : Jan 15 01:02:14.661 2024 GMT
                    Extensions: none
                    Signature : ecdsa-with-SHA256
                                30:45:02:21:00:B2:6C:D6:E4:9D:FA:EB:15:FD:40:96:
                                D8:BF:18:20:22:4F:85:28:FF:7A:99:2C:CF:D5:DB:29:
                                FE:14:72:94:62:02:20:3C:09:EC:23:C1:C7:F5:AF:39:
                                99:20:A4:20:11:19:F8:52:68:A7:CD:F4:86:9A:F7:D4:
                                0E:AE:24:E2:98:D5:AA
    Signature Algorithm: sha256WithRSAEncryption
    Signature Value:
        76:ff:1a:52:3a:df:33:7c:6a:74:2a:55:cb:96:58:55:40:99:
        8d:ea:a9:0b:81:0e:d6:3f:87:3e:e5:ca:8b:c3:4d:7b:29:f3:
        60:ca:89:7f:85:e8:b4:64:bb:08:95:d6:cb:8f:7a:39:4f:e6:
        8c:de:14:b5:3b:13:ba:76:fd:39:c6:cf:76:9c:93:fd:b0:c1:
        ab:6a:61:79:91:e7:9e:c0:0f:28:1d:f9:4e:ef:f6:dd:34:81:
        53:af:56:92:40:aa:38:a0:b1:30:18:cd:ad:00:31:ee:d0:a3:
        cd:1a:8b:d0:36:38:26:70:44:cb:a2:58:73:f8:31:e8:48:1f:
        8d:9f:d2:b3:d8:06:42:bc:9a:ba:97:16:95:bb:9c:19:ba:9a:
        5f:4d:18:69:57:b2:fd:3e:c3:ce:8b:7a:af:60:db:ad:9e:a9:
        f1:cf:52:31:ef:53:36:d1:72:85:2b:5d:51:43:d8:a7:0d:0e:
        21:3f:6d:03:0d:e0:1d:68:d6:1c:51:bd:75:5c:7c:7b:5e:74:
        ed:58:70:c3:d1:01:72:29:78:ef:80:f7:84:f6:a3:f4:22:e9:
        2a:4d:28:e2:b1:94:ae:80:20:9f:7b:72:af:a3:a7:c3:31:d5:
        e0:e7:e0:2c:21:fb:a6:48:c9:70:9a:8d:d6:34:d1:28:8b:c4:
        ff:6d:fe:40
This is a lot, but we can see the fields we expect:
- subject: C=US, ST=California, L=SAN FRANCISCO, O=REDDIT, INC., CN=*.reddit.com
- issuer: C=US, O=DigiCert Inc, CN=DigiCert TLS RSA SHA256 2020 CA1
- subject’s public key information
- certificate signature
- validity:
- from: Jan 15 00:00:00 2024 GMT
- to: Jul 13 23:59:59 2024 GMT
So now that we have a way to link an identity (the subject) to a public key via certificate, the question is, how can we trust the certificate?
Certificate Authority
One of the ways of establishing trust in a certificate is for it to be issued by a trusted party. We call these trusted parties Certificate Authorities - for them trust is a given and not derived. In cryptographic terms, they are called trust anchors.
The major operating systems as well as some browsers contain a list of certificates of CAs that are trusted by default, this is usually called the Certificate Store.
Certificate Chain
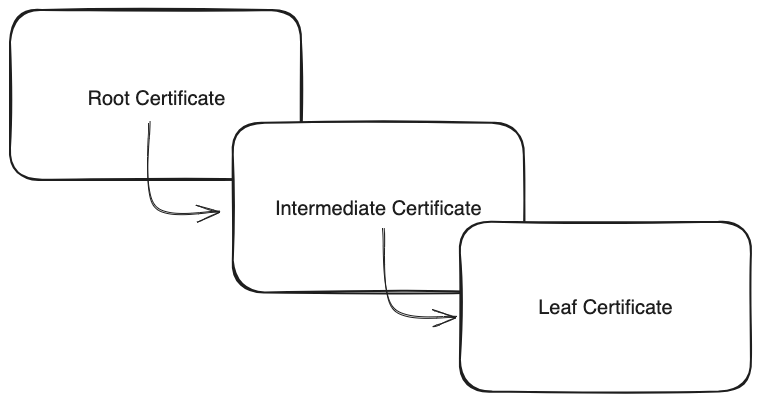
Now, we don’t always have certificates issued directly by a CA, but rather by an intermediate (or several intermediates). The certificate at the top of this certificate chain is called the Root Certificate, while the one at the bottom is called the Leaf Certificate. An important distinction is that Root Certificates are self-signed (subject and issuer are the same).
The procedure of validating the path from the Leaf Certificate to the Root Certificate is called Certification Path Validation.
Practice: Generating our own certificates!
In this practical section, we’ll walk through generating x.509 certificates to serve content over https using an NGINX server.
The code can be found at: https://github.com/aalbacetef/x => blog/public-key-certificates
Note: this is for educational purposes, in production you should be using something like certbot or Terraform with the ACME provider (link).
Overview
The steps we’ll take are to first generate a self-signed certificate that we’ll use as our Certificate Authority and add it to our system’s Certificate Store. Then we’ll use this certificate to issue a certificate for our site (in this case: example.localhost).
Generate CA certificate
Create a directory in which to store the certificates and generated keys:
mkdir certs
Generate RSA keys for the CA:
openssl genpkey \
    -out certs/ca.pvt.pem \
    -outform PEM \
    -outpubkey certs/ca.pub.pem \
    -algorithm RSA \
    -pkeyopt bits:4096
Note: we use RSA, but you can use other algorithms such as Ed25519.
Generate self-signed CA certificate:
openssl req -x509 \
    -subj "/C=US/O=My Dev CA/CN=localhost" \
    -key ./certs/ca.pvt.pem \
    -outform PEM \
    -out certs/ca.crt.pem \
    -days 7000
Our CA is defined as:
- Country: US
- Organization: My Dev CA
- Common Name: localhost
Add to Certificate Store
So that we can make use of this certificate, we’ll add it to our system’s certificate store.
Linux
The method will vary according to the distro, but it essentially involves placing the certificate in a specific folder and then invoking a command.
Ubuntu/Debian distros:
# ensure package is installed
sudo apt install -yq ca-certificates

# copy certificate (extension must be .crt)
sudo cp ./certs/ca.crt.pem /usr/local/share/ca-certificates/ca.crt

# update certificate store
sudo update-ca-certificates
If successful, the command should notify you that a certificate was added, and you should see it in /etc/ssl/certs.
Fedora:
# ensure package is installed
sudo dnf install -yq ca-certificates

# copy certificate
sudo cp ./certs/ca.crt.pem /usr/share/pki/ca-trust-source/anchors/

# update certificate store
sudo update-ca-trust
If successful, the command won’t print anything but you can find the certificate attached to the pem files in /etc/pki/ca-trust/extracted/pem/ (it will be preceeded with the Common Name as a comment).
Mac
You can double click the certificate and add it via the Keychain app or run the following command:
sudo security add-trusted-cert -d -r trustRoot -k /Library/Keychains/System.keychain ./certs/ca.crt.pem
Note: you may need to have your browser import the certificate. On Firefox, this can be accessed via Settings -> Preferences -> Certificate Manager. On Chrome-based browsers: go to chrome://settings/certificates and under Authorities import the certificate.
Generate site certificate
Since our NGINX server will be running on example.localhost, we’ll use that as the Common Name.
First we generate our keypairs and Certificate Signing Request:
openssl genpkey \
    -out certs/example.pvt.pem \
    -outform PEM \
    -outpubkey certs/example.pub.pem \
    -algorithm RSA \
    -pkeyopt bits:4096

openssl req \
    -inform PEM \
    -outform PEM \
    -new \
    -key certs/example.pvt.pem \
    -addext 'basicConstraints = CA:FALSE' \
    -addext 'subjectAltName = DNS:example.localhost' \
    -subj '/C=US/O=Example LLC/CN=example.localhost' \
    -out certs/example.csr.pem
Then sign it with our CA certificate and key:
openssl req \
  -in ./certs/example.csr.pem \
  -inform PEM \
  -CA ./certs/ca.crt.pem \
  -CAkey ./certs/ca.pvt.pem \
  -copy_extensions copyall \
  -days 700 \
  -outform PEM \
  -out ./certs/example.crt.pem
NGINX server
Our project will have the following files:
|-- nginx.conf
|-- certs/
|   |-- example.crt.pem
|   |-- example.pvt.pem
|   `-- example.pub.pem
`-- public/
    |-- index.html
nginx.conf
user  nginx;
worker_processes  1;
error_log  /var/log/nginx/error.log warn;
pid        /var/run/nginx.pid;

events {
    worker_connections  1024;
}


http {
    include       /etc/nginx/mime.types;
    default_type  application/octet-stream;
    sendfile on;
    log_format  main  '$remote_addr - $remote_user [$time_local] "$request" '
                      '$status $body_bytes_sent "$http_referer" '
                      '"$http_user_agent" "$http_x_forwarded_for"';

    access_log  /var/log/nginx/access.log  main;
    keepalive_timeout  65;

    server {
        listen 80;
        server_name example.localhost;
        return 301 https://example.localhost$request_uri;
    }

    server {
        listen 443 ssl;
        server_name example.localhost;
        ssl_certificate     /certs/example.crt.pem;
        ssl_certificate_key /certs/example.pvt.pem;
        ssl_protocols TLSv1.2 TLSv1.3;
        ssl_ciphers "EECDH+ECDSA+AESGCM EECDH+aRSA+AESGCM EECDH+ECDSA+SHA384 EECDH+ECDSA+SHA256 EECDH+aRSA+SHA384 EECDH+aRSA+SHA256 EECDH+aRSA+RC4 EECDH EDH+aRSA RC4 !aNULL !eNULL !LOW !3DES !MD5 !EXP !PSK !SRP !DSS";

        ssl_session_cache shared:SSL:50m;
        ssl_session_timeout 5m;

        root /var/www/html;

        index index.html;
        autoindex on;
    }
}
public/index.html
<!DOCTYPE HTML>
<html lang="en">

<head>
  <meta charset="utf-8" />
  <title>Example: Public Key Certificates</title>
  <meta name="viewport" content="width=device-width, initial-scale=1.0" />
</head>

<body>
  <h1>It worked</h1>
</body>

</html>
You can then build the server with podman or docker:
podman run --rm -it \
    -p80:80,443:443 \
    -v ./nginx.conf:/etc/nginx/nginx.conf \
    -v ./public:/var/www/html \
    -v ./certs:/certs \
    nginx:alpine
or:
docker run --rm -it \
    -p80:80,443:443 \
    -v ./nginx.conf:/etc/nginx/nginx.conf \
    -v ./public:/var/www/html \
    -v ./certs:/certs \
    nginx:alpine
Note: if you get a permission denied error, you will need to run:
sudo sysctl net.ipv4.ip_unprivileged_port_start=80
On Mac, when using podman, this command will need to be run inside the VM, which you can access with podman machine ssh:
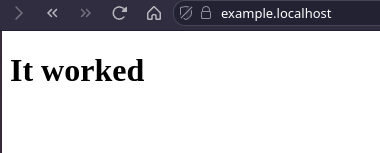
Now that you’ve got your server up and running, you can simply visit https://example.localhost and you should see:


